About Monkey 2 › Forums › Monkey 2 Code Library › Simple image shader (GLSL)
Tagged: 2d, 3d, GLSL, render target, rendertarget, Retro, retro fx, retrofx, shader, Shaders, speccy, spectrum, zx
This topic contains 8 replies, has 2 voices, and was last updated by ![]() DruggedBunny
DruggedBunny 1 hour, 20 minutes ago.
Viewing 9 posts - 1 through 9 (of 9 total)
-
AuthorPosts
-
January 13, 2019 at 10:45 pm #15895
This is a very simple pixel shader for modifying images using a GLSL shader.
In this case, the shader changes each pixel’s colour to a greyscale (average) version:

It’s formed of two parts, the Monkey2 code and the GLSL shader code.
The file structure should be:
- the Monkey2 code and an assets folder next to each other;
- the GLSL file in a shaders folder within assets. (“assets/shaders/basic.glsl”)
A pre-made zip setup can be downloaded here.
Monkey2:
Monkey
123456789101112131415161718192021222324252627282930313233343536373839404142434445464748495051525354555657585960616263646566676869707172737475767778798081828384858687888990919293949596979899100101102103104105106107108109110111112113114115116117118119120121122#Import "<std>"#Import "<mojo>"#Import "assets/"Using std..Using mojo..Class ImageRenderTargetField image:ImageField canvas:CanvasMethod New (width:Int, height:Int, centered:Bool = True)' Adapted from DoctorWhoof's Plane Demo -- thanks, DoctorWhoof!image = New Image (width, height, TextureFlags.Dynamic, Shader.Open ("basic"))If centeredimage.Handle = New Vec2f (0.5, 0.5)Endifimage.Material.SetInt ("Toggle", False)canvas = New Canvas (image)canvas.Clear (Color.Brown)canvas.TextureFilteringEnabled = FalseEndEndClass Demo Extends WindowConst WINDOW_WIDTH:Int = 960Const WINDOW_HEIGHT:Int = 540Const WINDOW_FLAGS:WindowFlags = WindowFlags.ResizableField x:FloatField y:FloatField width:Float = 2Field height:Float = 2Field xdir:Float = 1Field ydir:Float = 1Field toggle:BoolField target:ImageRenderTargetMethod New (title:String = "Image Shader Demo", width:Int = WINDOW_WIDTH, height:Int = WINDOW_HEIGHT, flags:WindowFlags = WINDOW_FLAGS)Super.New (title, width, height, flags)EndMethod OnCreateWindow () Overridetarget = New ImageRenderTarget (640, 480)Mouse.PointerVisible = FalseEndMethod OnRender (canvas:Canvas) Override' Ask app to render itself...RequestRender ()If Keyboard.KeyHit (Key.Escape) Then App.Terminate ()' Toggle B & W shader effect...If Keyboard.KeyHit (Key.Space)toggle = Not toggle' NOTE: The "Toggle" string is received in the shader code as m_Toggle, ie. is automatically prefixed with "m_".target.image.Material.SetInt ("Toggle", toggle)Endif' Simple movement code for the random-colour dot being drawn onto the render target...x = x + xdiry = y + ydirIf x < 0 Or x > target.canvas.Viewport.Widthxdir = -xdirx = x + xdirEndifIf y < 0 Or y > target.canvas.Viewport.Heightydir = -ydiry = y + ydirEndif' Draw onto render target canvas; shader will affect the result:target.canvas.Color = Color.Rnd ()target.canvas.DrawRect (x, y, width, height)target.canvas.Flush ()' Draw resulting image onto main window canvas:canvas.TextureFilteringEnabled = Falsecanvas.Clear (Color.Pine)canvas.DrawImage (target.image, canvas.Viewport.Width * 0.5, canvas.Viewport.Height * 0.5)', (Pi / 180.0) * angle)canvas.DrawText ("Space to toggle B & W shader", 20, 20)EndEndFunction Main ()New AppInstanceNew DemoApp.Run ()EndGLSL:
This code must be placed into assets/shaders/basic.glsl:
Monkey
1234567891011121314151617181920212223242526272829303132333435363738394041424344454647484950515253545556575859606162636465666768697071727374757677// --------------------// BOILERPLATE BEGINS!// --------------------//@renderpasses 0varying vec2 v_TexCoord0;varying vec4 v_Color;//@vertexattribute vec4 a_Position;attribute vec2 a_TexCoord0;attribute vec4 a_Color;uniform mat4 r_ModelViewProjectionMatrix;uniform vec4 m_ImageColor;void main(){v_TexCoord0=a_TexCoord0;v_Color=m_ImageColor * a_Color;gl_Position=r_ModelViewProjectionMatrix * a_Position;}//@fragment// --------------------// BOILERPLATE ENDS!// --------------------uniform sampler2D m_ImageTexture0;// m_Toggle is filled-in by image.Material.SetInt ("Toggle", toggle)// m_ prefix is automatically added by mojo...uniform bool m_Toggle;void main(){// Store "this" pixel's original colour:vec4 color = texture2D(m_ImageTexture0, v_TexCoord0);// Average out the RGB values:float average_rgb = ((color.r + color.g + color.b) * 0.333);// Build a new vec4 value with RGB each set to average_rgb, and alpha of 1.0:vec4 bw = vec4(average_rgb, average_rgb, average_rgb, 1.0);// If Toggle = True, set to B & W version of pixel, else draw default.// (gl_FragColor is the resulting pixel colour.)if (m_Toggle){gl_FragColor = bw;}else{gl_FragColor = color;}}You just create an ImageRenderTarget, using the image and canvas fields like so:
- canvas to draw to the canvas;
- image for drawing the resulting shaded image.
To set/get shader variables, you use the image.Material‘s Set/Get methods, as in the SetInt (“Toggle”, toggle) seen in this example. The Toggle string here relates to the m_Toggle value in the GLSL code (notice that the GLSL variable name is formed from this string, auto-prefixed by mojo with “m_”).
Thanks to DoctorWhoof (aka. Ethernaut) for the render target code and PixelPaladin for the example GLSL interfacing code.
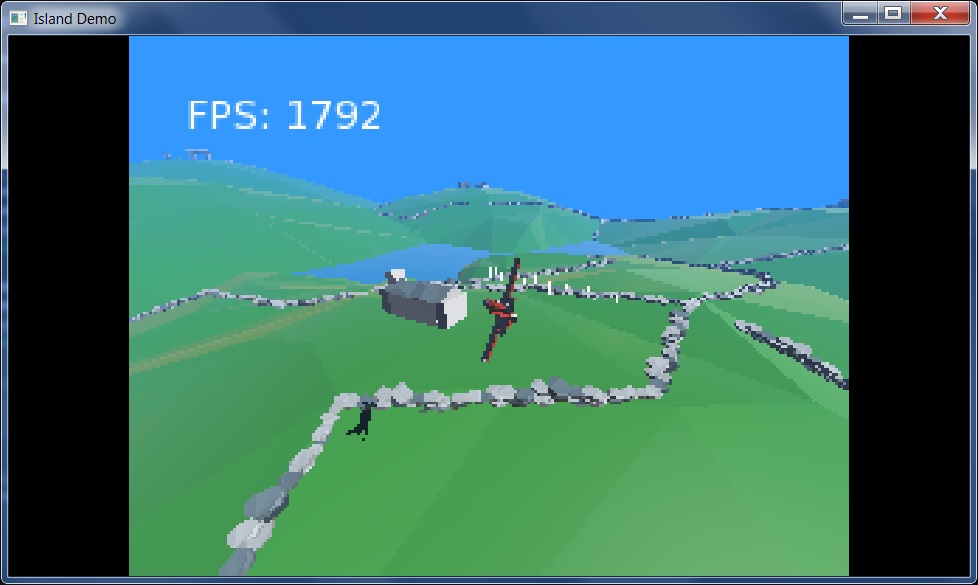
Next up, to finally do a workable ZX Spectrum shader on my Island demo (use L to toggle resolution), since I only need to operate on a tiny 256 x 192 image now, which is upscaled to the actual display size… (Done it before but it was far too slow as I was working on the entire display, and the attribute-clash part of the Spectrum shader is very intensive, checking 64 pixels around every single pixel for the most common colour!)
 January 13, 2019 at 11:59 pm #15896
Updated Island demo with the ImageRenderTarget code from above, now offers simple greyscale for starters. (L to toggle low-res, P to toggle greyscale in low-res mode.)
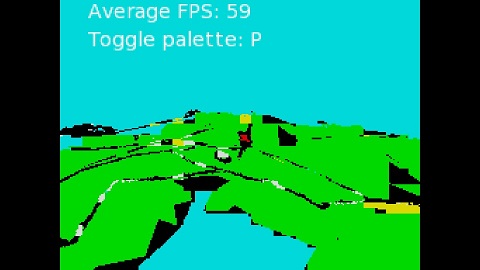
January 17, 2019 at 6:20 am #15936Update to Speccy Island!
Hit L to go Low-res, Spectrum-style, with attribute clash.
Hit P in low-res mode to toggle real colours. Full-screen it!
L gets back to normal res/colours.
Still WIP, but finally got a decent-performing shader that at least outputs legit Spectrum-compatible imagery, needs much tweaking still.
In theory, you could save a bunch of frames and display them for real on the Spectrum, as-is… which I’ll eventually try.
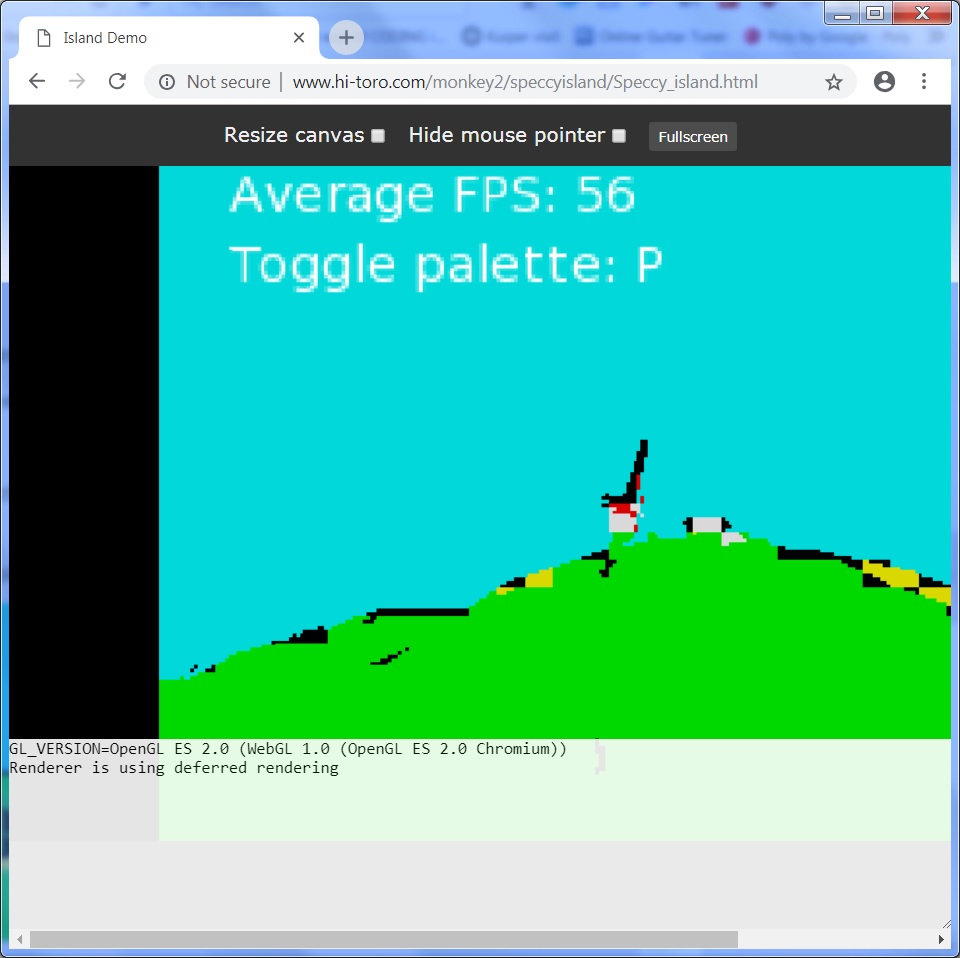
 January 17, 2019 at 7:34 am #15937
Which browser are you using? It’s not working on Chrome!
Failed to compile shader:ERROR: too many uniform
Working fairly nicely in FireFox!
January 17, 2019 at 8:23 am #15938Ah, only tried in FF, web not really being my main target, but had to do a few tweaks to get that to work. Get the impression cross-browser shaders are not a lot of fun!
January 17, 2019 at 1:31 pm #15940Hmm, weird, just installed Chrome and it’s working fine here! What platform/gfx card you on?
 January 18, 2019 at 3:39 am #15947
Well, 256 x 192 is rather a “challenging” candidate for turning a low-contrast, fairly washed-out, realtime rendered scene into 8 Spectrum colours (each with associated ‘dark’ version) with correct colour-clash, and without sampling every 8×8 block of pixels (a MASSIVE framerate hit since GLSL isn’t meant to read anything other than the ‘current’ pixel), it wasn’t feasible to select a suitable foreground and background colour that avoided constant flickering between the two as the scene changed, so I’ve amended the Spectrum’s display size.
Here’s how the scene would be rendered if the Spectrum’s display size was 1024 x 768 instead of 256 x 192, but still with correct colours and clash. You really have to see it moving to get the full effect!
Full-screen it. (Only testing web version in Firefox, apologies.)
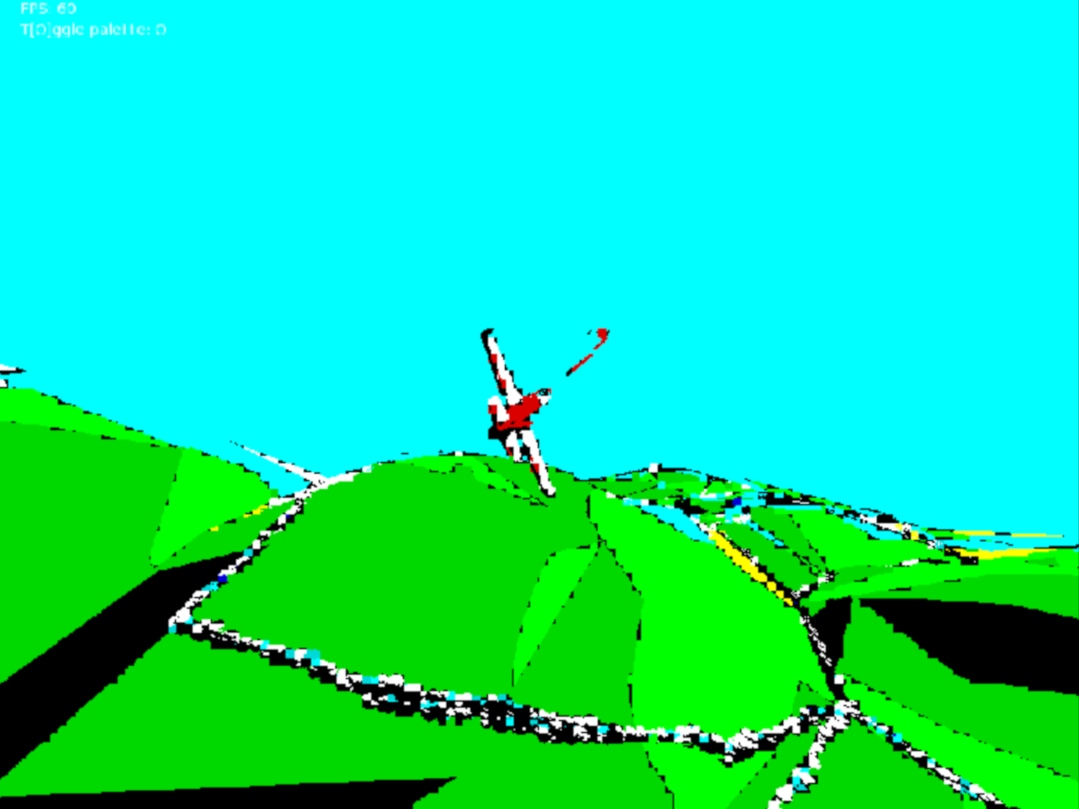
I’ll upload my code once I’m done messing about…
January 18, 2019 at 3:48 am #15948Also quite cool back in 256 x 192 but with colour clash turned off. (Separate link; again recommend full-screening it. Key L is still available to toggle low-res mode off.)
January 19, 2019 at 4:52 pm #15961 -
AuthorPosts
Viewing 9 posts - 1 through 9 (of 9 total)
You must be logged in to reply to this topic.